It's funny, when you have a knitted item you love, really love, sometimes there is no replacement.
My girlfriend that I am teaching to knit brought me these slippers. And said "don't laugh, can you fix these?" She said they were a gift from a girlfriend 14 years ago, and she has been wearing them. She said "they have molded to my feet perfectly!"
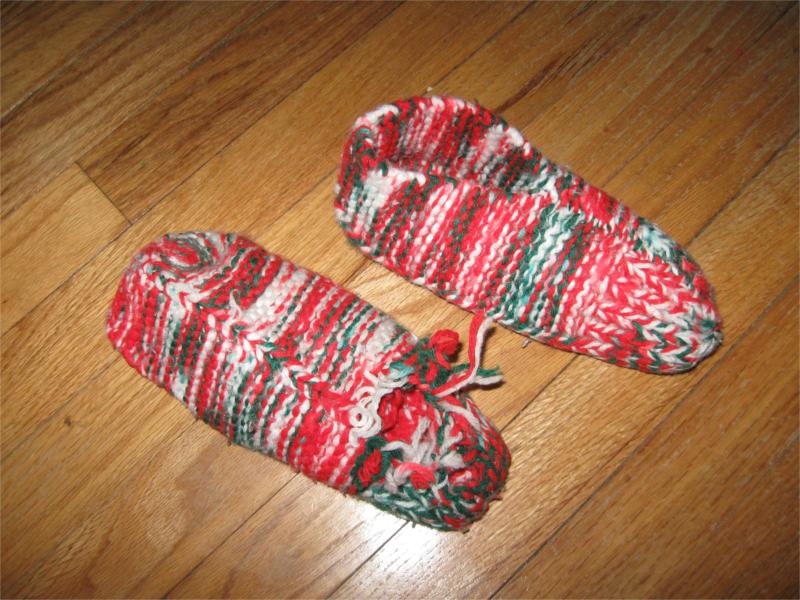
I recognized the pattern, thank goodness and offered to try and "mend" these but told her I will help her make another pair.
Of course the variegated acrylic Christmas? yarn may be hard to come by. I am going to try to use a plan red or white.
It looks like it is knitted double stranded, and knitted flat with purls on each side of the foot to make it form the sides, toe is a k1, p1. I remember making a pair of these many, years ago. I'm talking grade school.
She called them Elf slippers. Anyone out there know a link to something like this? I am currently just thinking of actually counting the rows.
Proof of how appreciated a knitted gift can be...sometimes I loose track of that.
I wish the woman who knitted these could know that, they survived the test of time, and have been loved very much.
Vicki,
ReplyDeleteTry this web site it has lots of patterns for slippers.
http://www.knittingpatterncentral.com/directory/slippers.php
Are your wrists and elbows getting tired from all the spinning we've been doing? Mine are. I will be glad for that day of rest.
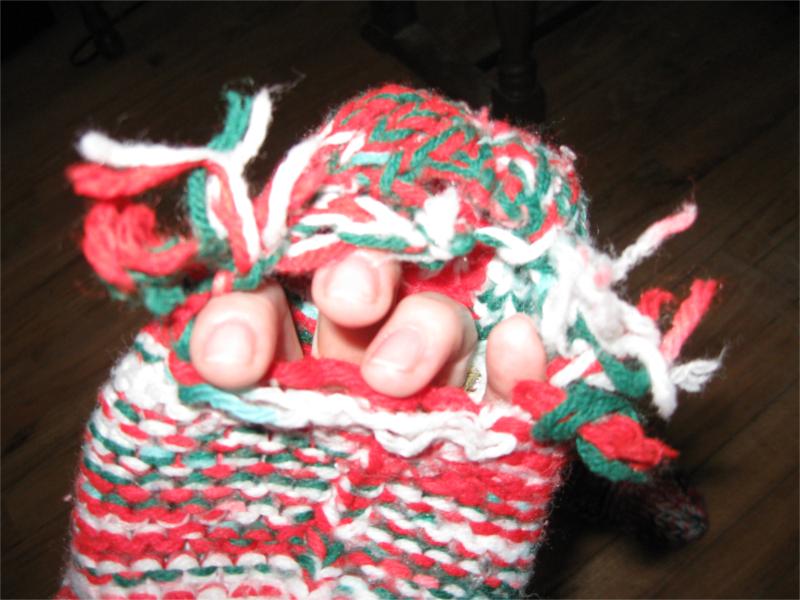
That's too funny! I love this post - including your fingers wiggling through the hole! BTW, my grandmother used to knit me slippers that looked a lot like this. I would be interested in the pattern if you come up with it.
ReplyDeleteHere's my grandma's pattern. YMMV:
ReplyDeleteSized for child(woman-man)
Plan slippers for 1/2" less than foot length.
Materials: Knitting yarn 1(2-2) 1 oz balls.
Needles: US7; crochet hook
Gauge: 5 sts = 1"; 10 rows = 1"
Beg at heel and leave 12" yarn end, CO 24(30-36) st
Row 1: Knit
Row 2: Wrong side - k8(10-12) p1, k6(8-10) p1 k8(10-12). Repeat rows 1 & 2 until piece is half the length end with row 2.
Next row: (right side) k2, inc 1 st in next st, k2, inc 1 st in next st, k4(8-11) inc 1 st in each of next 3 sts, k4(6-9) inc 1 st, k2, ince 1 st, k3 (31(37-43) st on needle.
Ribbing Row 1: p1, *k1, p1, Repeat from *
Work in ribbing until piece measure 1/2" less than desired length, end on row 1.
Dec Row 1: Work in ribbing on 7(9-11) sts, p3 tog, k1, p3 tog, work in ribbin on 3(5-7) st, p3 tog, k1, p3 tog work in ribbing on last 7(9-11) st. 23(29-35) st remain.
Dec Row 2: p1, *k1, p1. Repeat from *
Dec Row 3: Rib on 3(5-5) sts, p3 tog, work in ribbing on 11(13-19) sts,p3 tog, rib on 3(5-5) st. 19(25-31) st remain.
Dec Row 4: p1, *k1, p1, Repeat from *.
For child's stop. For men's and women's work another dec row: Rib on 3 sts p3 tog, rib on 13 sts for woman's (19 for men's), p3 tog, rib on 3 sts.
Work one row of knitting.
Cut yarn tail 12" or longer. Using crochet hook, pull the yarn through each stitch as you take the stitch off the needle. Thread a tapestry needle with the yarn tail. Pull the yarn tight so it closes up the toe and whip stitch at the top of the toe. Stitch the top of the foot edges together (or crochet) however you want [it's not rocket science] and stop stitching at the end of the ribbing.
HTH. I typed this real fast so let me know if I screwed something up.
THOSE ARE MY SLIPPERS!!!! I used to make these a lot as gifts when I was a teenager and into my twenties. They are the nicest warmest slippers in the world. I have searched every site I can find and never found the dang pattern, and I'm not nearly good enough to figure it out alone. I always made a pompom to sew onto the top. But other than that, they are the exact ones! Thanks to your reader who posted the pattern. Vicki, you have made my day! Wheeeee...I can make some this fall for winter!
ReplyDeleteI looked at the pattern from Paula and it seems different that what I remember. i recall starting at the toe and doing knit,purl and then the reverse, then switching to ribbing with a nine k,p, one purl, 9 kp, one purl, 9 kp to the end length. That made two lines that were the break from bottom of the foot to sides. If you get my drift. Then you did as she said about drawing the toe together, and then stitching up to just past the toe part. and then sewing the back together. LOL...Hope that made some sense.
ReplyDeleteI made son some slippers that look like that from a pattern but mine were made with bulky yarn. (it does use the purl stitches for the "folds") A friend does the double stranded worsted from a hand-written pattern that she keeps with the slippers. I'm thinking you can maybe get some solid red or green and create a heel. Similar to an afterthought heel maybe.
ReplyDelete