After my first attempt at a knitted wire birdhouse, see pattern link on sidebar, I decided to try another.
They are easy quick and fun, and I’m starting a series of them now.
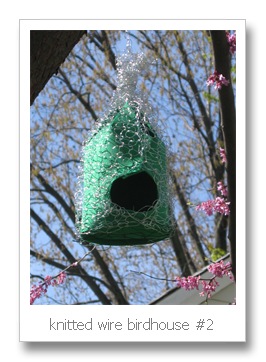
Knitted Wire Birdhouse #2
Using size 13 needles
And 26 Gauge Floral Wire, I used silver approx .94 cents
Two sheets of Foamies, choose your color (9 x 12 inch sheet) approx .65 cents each
Optional: crochet hook, size K, (any large size will do, gauge not important)
Warning: Please be careful of wire, it is sharp and can poke you, causing injury. Ouch..
Cast on 25 sts, loosely, I used the single cast on.

Knit every row. The house is constructed with the cast on and bind off edges, being in the front and this will form the entry hole.
While knitting you have to stretch out the wire and smooth in down, it will be very stretchy. When you reach your desired length pull and flatten it down. Similar to “blocking”

Knit until it measures approx. 12 inches. You can turn the piece around and see if this is large enough for your bird house, if it look too skinny, keep knitting until it is big enough around for your birds.
Bind off . I used the knitted bind off. My girlfriend had trouble with this, and we just thread the wire through the last row of stitches and removed from the needle.

Now lay your wire piece down and place your foamies under it. Trim your foamies to measure just short of the top of the house by about two inches.
Form the sides by pushing them in, to make one half of each side of your entrance hole. Now trace this onto your foamies and cut.

Now I turn the house over and make zig zag cuts on the top of my foamies, this will be pushed in to form the top of the house. After cutting, take the foamies and roll it up, see if the points come together to form the apex of the house, you may need to cut some deeper, or add more.

Stitch your house together using a shorter piece of floral wire, I “stitched” around the entry way to reinforce it. Stitch all of the way up to the top, leave top open.
Now gather you foamie up and roll it, then insert it into your house, I took my wire and “stitched” around the entry way to keep everything in place, and make it tidy looking.

Sit your house on a foamies and trace the bottom, cut it out and put it in place, hold it, (you may want to use some tape to hold it temporarily)

Your may weave the bottom, with a piece of wire, just go back and forth across until it is sturdy enough , if your bottom is not staying in place use a piece of wire to “sew” it around the edges.
Take the top of the house and “gather” it up with a piece of wire, or just scrunch it together at top and wrap a piece of wire around it, until secure.
Now we are ready to make a hanger, I crocheted one by chaining with a large crochet hook until, my chain was long enough. If you don’t want to do this, a length of yarn, rope etc will also work.
If you made a chain from your wire, just twist it on, and twist any pokie bits out of the way.

Now pick out a spot and hang your bird house up!
May your knitting needles fly as fast as Dragonflies..

Comments
Post a Comment
Thank you for leaving a comment I love reading them and really appreciate you taking the time to let me know you were here!